In some recent rigging, I gave myself the task of rigging a loose sleeve cuff of a character, that would react with the wrist's rotation from flat horizontal, to vertical tall. There were quite a few approaches to this idea, including some that included pose reading. However, there was one novel approach I attempted and admittedly spent a few days figuring out. Luckily it works like a charm, and I call it my "rubber-band" rig.
The rig had to compose of nodes that were native found in my copy of Maya, no custom nodes, just nodes that could "kill" computations quickly for a highly responsive joint-based setup. The rig primarily comprises of these nodes:
- Nearest Point on Curve
- Point On Curve Info
- Conditions (lots of conditions!)*
- Multiply/Divide
- plusMinusAverage
- Distance Between
- Matrix Decompose
I've coined the title "affector position" as a position in space that will affect a series of joints. I know affector is not really a "noun" but more of a verb (so says Websters Dictionary) but I thought it fit the type of action the position causes. It's the cause for the movement of the joints in the system, therefore I stuck with the name affector, as much as it does not fit in the proper English vocabulary.
* Condition nodes only take in one argument! This means 3x conditions per joint! Aye Caramba!
One Joint of Array: Network Breakdown
Fig. 1: A High-Level Look at the Node Network for One Joint
The network above shows what sort of setup I was using for each joint. You can see there are various affectors feeding into assets (those grey boxes) that determine the main movement of each joint. These feed into the final sum of movements for the joint seen in the large black space where all the green lines feed into.
Fig. 2: A Closer look at the asset doing the work
The asset gets 3 primary bits of information. This includes:
- The affector's location
- The affector's relative parametric location on a reference curve
- The original location of the joint being moved
This allows the asset to mainly calculate difference values.
You will notice that the asset has two smaller "containers" inside it, these are also assets. They perform the main difference value checks within the main asset. They are separated as they both handle different difference values. The values they cover are below:
The ParamDiff (Parametric Difference)
Fig. 3: Calculation of the distance between the parametric positions
The paramDiff takes in world space matrix co-ordinates from both the relative parametric position of the affector and the the starting point of the joint, and offers a difference value between the two in a percentage. Using a range value, we turn the position difference into a percentage of the range specified.
The difference in param values is important to my rig as it acts as a relative weighting value. Since the distance that the joint and affector may travel could be any distance, having a relative distance that exists in 1 dimension is key.
The Field Generator
Fig 4: The wrist's "field generator" asset primarily determines a diff value in each local space (- to +)
The field generator asset is one that may require more in-depth discussion, which I may provide later on in a tutorial, but the breakdown of it consists of taking in two points in space: the original location of the joint, and the affector's position, to determine the amount of distance the joint should move in following the affector.
The field generator is capable of finding relative diffs in each axis, and offering percentage values as well, given a provided radius for either each axis or the overall axis of the field-generator itself. Depending upon the type of diff it offers, I target the known moveable axis that the joints should move in. That is to primarily allow joints to not cave in on themselves, retaining structural integrity of the shape.
Another value the field generator provides is just an overall distance, which in the case of my project, determines whether the affector is outside the radius of each joint's starting position.
Visual Breakdown of the Scene
1. Skinned Joints
Fig 5: Skinned Joints
The skinned joints are joints that represent the final transforms. They are connected and move with the final curve as seen above. They are connected with their transforms being dictated by Point On Curve Info nodes. These nodes take a param value on a supplied curve, and then output locations of the points in world space. These values are fed into the joints so the joints follow the curve 1:1
The curve is a final curve because it receives a blend shape input from a secondary curve, which itself is controlled by skinned controller joints.
2. The Controller Joints & Secondary Curve
Fig 6: Affector and controller joints in action
The affector control affects a joint I've named the "controller joint" which is skinned to a secondary curve. The controller joints all have locators specifying their original location in space. This is to allow a diff value to be accurately taken between these objects, as the controller joint's location changes in space and can be either closer/further from the affector depending upon various variables (ie. radius, parametric location).
3. Parametric-Relative Based Influence Over Joint
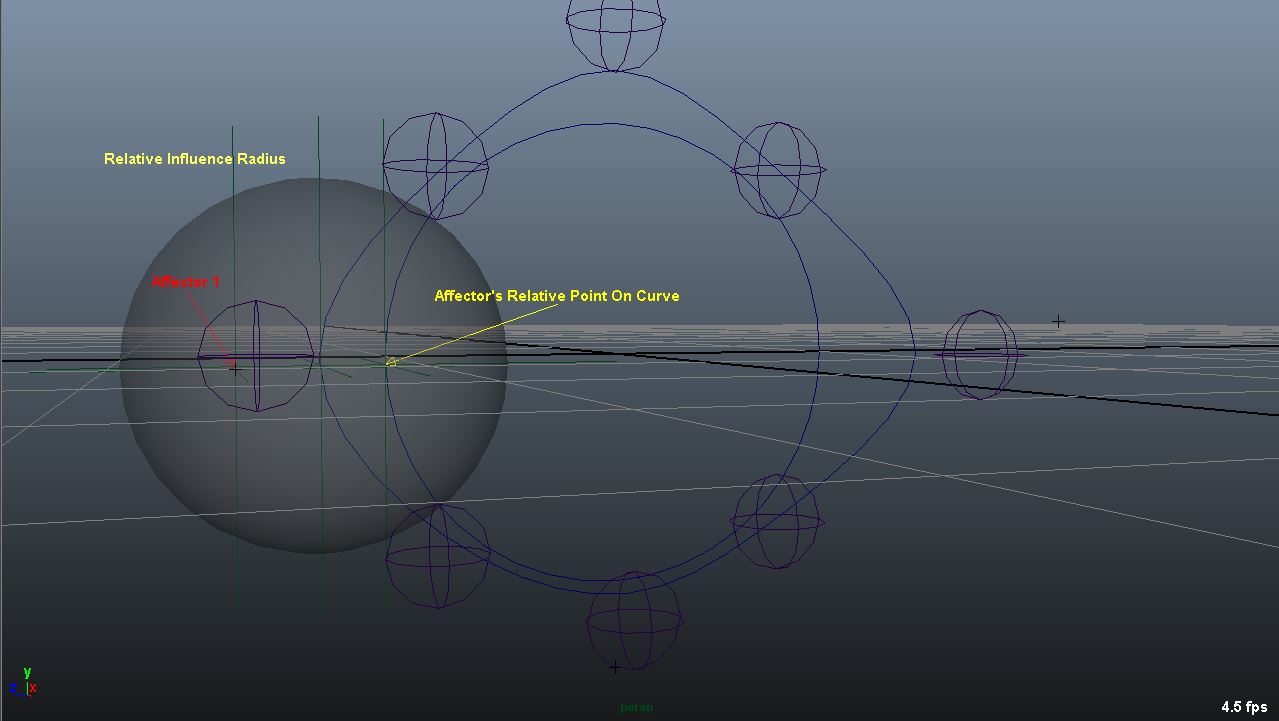
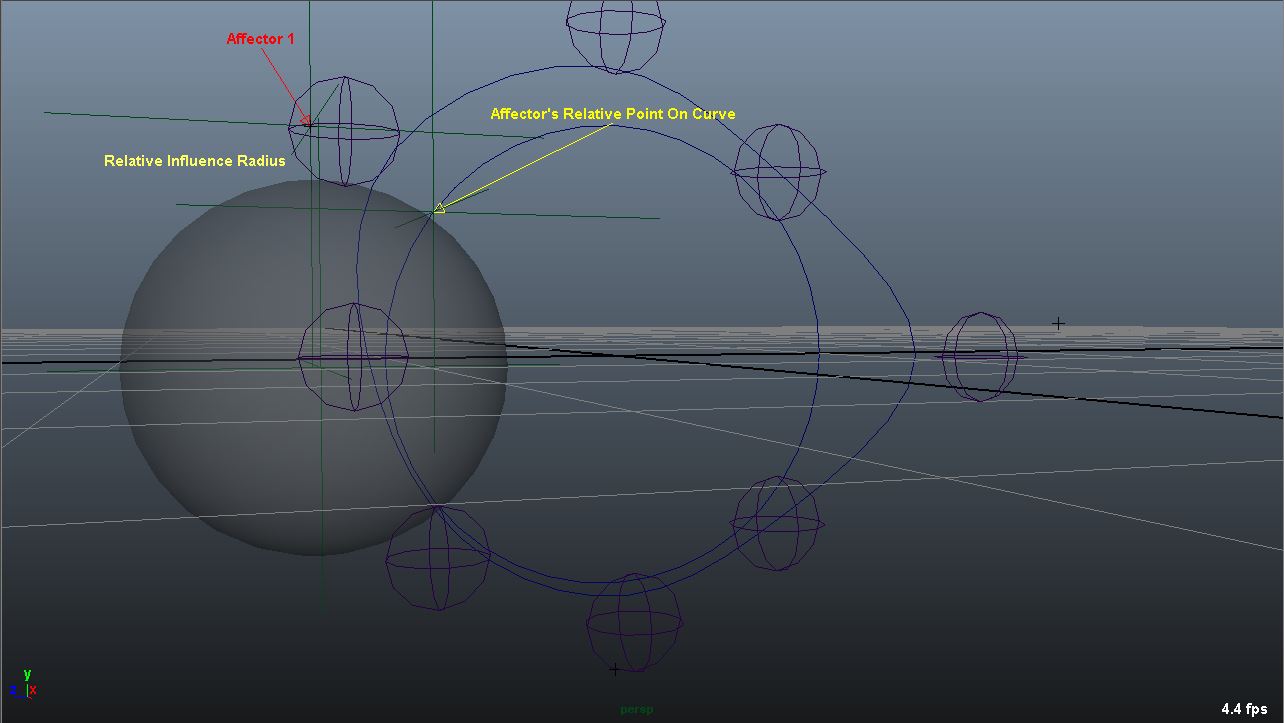

The semi-transparent sphere in the image above shows the area of influence that exists on the curve from the control joint's original location.
As you can see if you toggle through the images, as the affector's relative point on curve moves away from the center position, it's influence over the controller joint diminishes some-what linearly, and the next joint begins picking up an influence.
The un-changed circle in the middle is also a reference shape for which the affector's relative point on curve lives on. I use a Nearest Point On Curve node that takes in the affector's position and finds a parametric location on the supplied circle. The value returned is a world-space transform that exists only on the curve, and can be used to solidify the difference against the joint's starting position.
Closing Comments
As you can see, the nature of this relationship offers some interesting automated methods of deforming a shape within space. The grand-idea of this whole rig is that it utilizes non-complicated math, nor labour-intensive in solving for.
My rig setup here affects joints in the end of the chain, but these could be anything really. If you're wanting to jump straight to skinning the joints as they are, this is possible, but in my case, I probably will use these joints as parents for constrained joints. As well, the density of affected points is only limited by the visual density required. Because the end-joints are merely Point On Curve constrained to the curve, you can add more at any point you so wish.
Again, no complicated C++ API programming required here, just a lot of patience and node-connecting.